
A DNS propagation check verifies whether a DNS record change has spread across global servers. Use a free tool like WhatsMyDNS or DNSChecker.org to test your domain. Propagation takes 30 minutes to 72 hours depending on your TTL setting. For email records like MX, SPF, DKIM, and DMARC, always check each record type separately to confirm your email is routing correctly.
You just updated your domain’s DNS settings. Maybe you added a new mail server, set up an SPF record, or changed a DKIM key. Now you’re waiting and wondering: did it actually go through?
This is exactly what a DNS flag propagation check is for. It tells you whether your DNS record change has reached global servers or is still stuck in a queue somewhere. This guide walks you through everything step by step, with a special focus on email-related DNS records.
What Is a DNS Propagation Check?
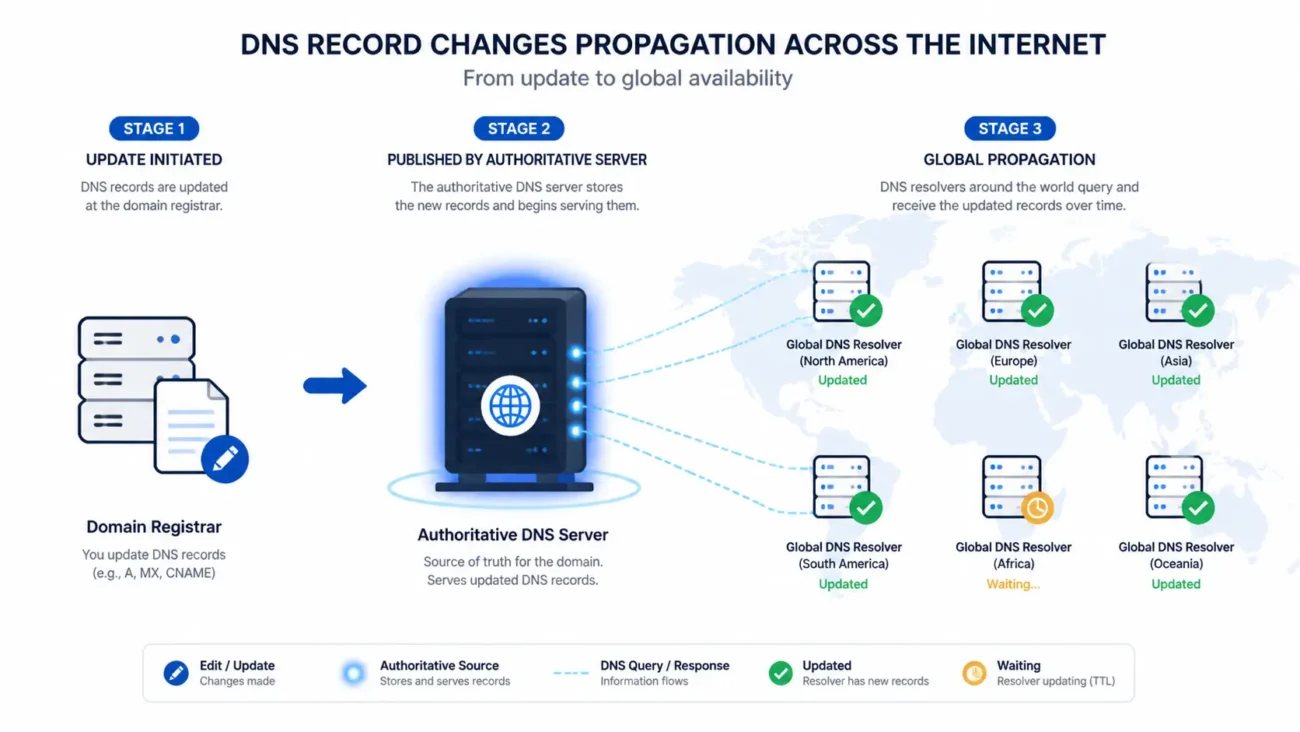
When you change a DNS record, that change does not happen instantly across the internet. Instead, DNS servers around the world store old record data in their cache. Each server waits for its cache to expire before it fetches the new data.
A DNS propagation check is a test that queries multiple DNS resolvers and name servers across the globe at the same time. It shows you which servers have picked up your new record and which ones are still showing the old information.
Think of it like updating a phone book. The publisher changes your number, but not every library gets the new edition on the same day. Understanding how email sorting works can help you see why accurate DNS records matter so much for smooth email delivery.
How Long Does DNS Propagation Take?
This is the most common question people ask after making a DNS change. The honest answer is: it depends.
The main factor is your TTL, which stands for Time to Live. TTL is a number measured in seconds that tells DNS resolvers how long to keep your record in cache before refreshing. A high TTL means a longer wait. A low TTL means a faster update.
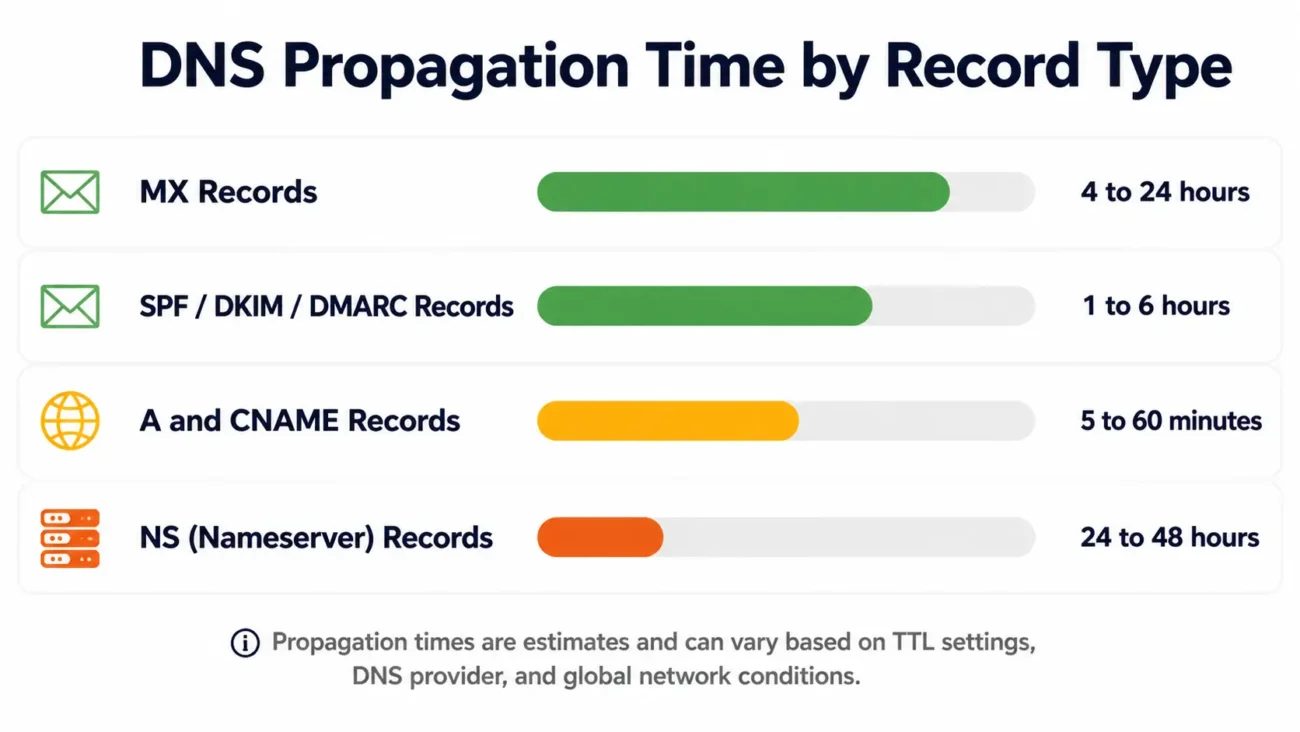
Here is a quick reference for common record types:
| DNS Record Type | Typical Propagation Time |
| A and CNAME records | 30 minutes to 48 hours |
| MX (mail exchange) records | 4 to 24 hours |
| SPF, DKIM, and DMARC records | 30 minutes to 24 hours |
| NS (nameserver) records | 24 to 48 hours |
In most cases, DNS changes are visible on the majority of servers within 24 hours. In rare cases with very high TTL settings, it can take up to 72 hours for full global propagation.
How to Run a DNS Flag Propagation Check (Step by Step)
Running a propagation check is much simpler than it sounds. Follow these steps and you will have your answer in under two minutes.
Step 1: Identify which DNS record you changed.
Was it an MX record for your mail server? A TXT record for SPF or DKIM? An A record pointing to your web host? Knowing the record type is essential before you run any check.
Step 2: Go to a DNS propagation checker tool.
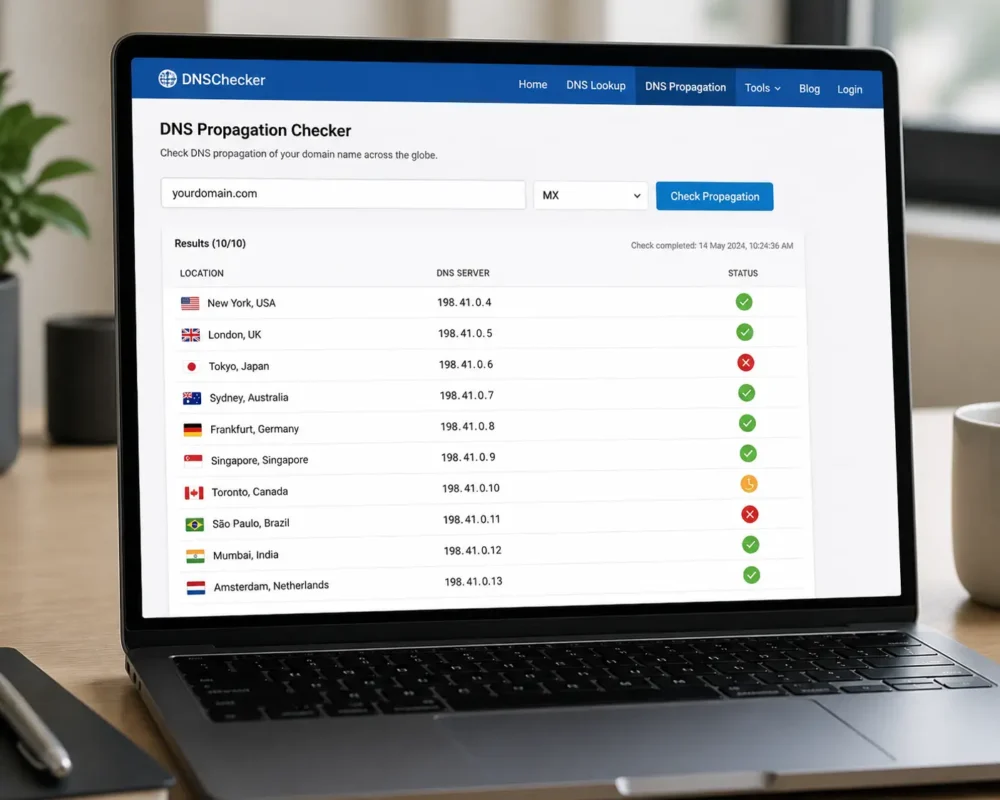
Open one of the free tools listed in the next section. WhatsMyDNS and DNSChecker.org are the most popular options for global checks.
Step 3: Enter your domain name and select the record type.
Type your full domain (for example, yourdomain.com) into the search field. Then pick the record type from the dropdown menu. For email setup, you will usually check MX, TXT, or A records.
Step 4: Run the check.
Hit the search or check button. The tool will query 30 to 100 DNS servers across different countries and display the results on a map or list.
Reading Your Results
Each server result will show either a green checkmark or a red X.
- Green checkmark: That server has your new DNS record. Good news.
- Red X: That server still holds the old record. It has not refreshed yet.
Do not panic if you see some red Xs early on. This is completely normal. Propagation is a gradual process, not an instant switch.
What If It Still Shows the Old Record?
If most servers still show the old record after 24 hours, check two things. First, confirm the change was saved correctly in your domain registrar or DNS host settings. Second, check what TTL value was set before you made the change. A TTL of 86400 (24 hours) means servers will hold the old cache for up to a full day.
Best Free DNS Propagation Checker Tools in 2026
There are several reliable tools available at no cost. Here is a quick comparison:
| Tool | Best For | Record Types Supported |
| WhatsMyDNS.net | Quick global spot checks | A, MX, TXT, CNAME, NS, and more |
| DNSChecker.org | Visual map view across 100+ servers | All major record types |
| MXToolBox | Email-focused DNS checks and diagnostics | MX, TXT, SPF, DKIM, and blacklists |
| nslookup.io | Technical users who want raw DNS data | All major record types |
| PowerDMARC DNS Checker | DMARC and email authentication records | TXT, DMARC, SPF, DKIM |
For most users dealing with email DNS records, MXToolBox and PowerDMARC are the strongest choices. They are built to handle email authentication records like SPF, DKIM, and DMARC, which are the record types most likely to affect your email delivery.
Why DNS Propagation Matters for Email Delivery
This is the section most DNS guides skip. But for anyone managing email for a domain, it is the most important part.
When you change an MX record, you are telling the internet which server should receive email for your domain. If that change has not propagated yet, incoming messages may still go to your old mail server or bounce entirely.
When you set up or update SPF, DKIM, or DMARC records, you are adding email authentication signals. These tell receiving servers like Gmail and Yahoo that your emails are legitimate. If these records are missing or not yet propagated, your messages can fail authentication checks and land in spam.
Since 2024, both Gmail and Yahoo now require bulk email senders to have valid SPF, DKIM, and DMARC records in place. This makes DNS propagation checks for email more important than ever. A failed propagation means failed authentication, which means failed delivery.
Once you have confirmed your DNS records are live globally, the next step is making sure your inbox is set up to handle the mail flow. Check out this guide comparing rule-based vs AI email sorters to see which routing approach fits your setup best.
How to Speed Up DNS Propagation
You cannot force DNS propagation. Every DNS resolver on the internet has to wait for its cached record to expire on its own schedule. However, you can take steps to make the process faster.
Lower your TTL before making changes.
At least 24 to 48 hours before you plan to change a DNS record, log in to your DNS host and lower the TTL to 300 seconds (five minutes). When the change goes live, servers will refresh their cache in just five minutes instead of hours.
Flush your local DNS cache.
Your own computer keeps a local DNS cache too. Clearing it means you stop seeing the old record on your end. Here is how:
- Windows: Open Command Prompt and run ipconfig /flushdns
- Mac: Open Terminal and run sudo dscacheutil -flushcache
- Linux: Run sudo systemd-resolve –flush-caches
Use Google or Cloudflare DNS to verify.
Switch your device’s DNS server temporarily to Google Public DNS (8.8.8.8) or Cloudflare DNS (1.1.1.1). These servers refresh faster than many ISP-provided resolvers, so they often show the new record sooner.
Common Mistakes to Avoid
Even technical users make these mistakes when checking propagation.
Checking too soon. Running a propagation check within the first 10 minutes of a DNS change and assuming something is broken. Give it at least one hour before drawing conclusions.
Only checking from one location. Using a single DNS lookup tool or your browser’s address bar only tells you what one server sees. A global propagation checker queries dozens of servers at once and gives you a real picture of propagation progress.
Forgetting to check all record types. If you updated both your MX record and your DKIM TXT record, check both separately. One may propagate faster than the other.
Not resetting TTL after changes. Once your propagation is confirmed, raise your TTL back to a normal value (3600 to 86400 seconds). A permanently low TTL puts unnecessary load on your DNS infrastructure.
Final Thoughts
Running a test query for flag propagation check does not have to be stressful. Use a reliable tool like WhatsMyDNS, DNSChecker.org, or MXToolBox. Check the right record type. Give it time. And if you are setting up email authentication records, make sure you verify SPF, DKIM, and DMARC separately.
The whole process takes under five minutes once you know what to look for. And the peace of mind that comes from confirming your email DNS is live globally? That is worth every second.
Once your DNS is clean and verified, the next step is making sure your inbox is actually organized to handle the mail that flows through it. Browse the top 10 email sorters compared to find the right tool to keep your inbox running smoothly after your DNS setup is complete.